


 I’ve been advancing my guerilla gardening efforts recently, with a significant new raised bed now beautifying my nature strip, as seen in the picture at right. I thought in this post I could provide a brief overview of how to build a cheap raised bed, either for use on your nature strip or in your front or back yards. This overview might seem a bit basic for the handy builders among you, so I direct this post to those who are beginning their journey into guerilla gardening and urban agriculture.
I was moved to write this post after attending an environmental festival recently where raised beds like the one I have built were priced between $800 and $1000! Mine cost considerably less than $100, including the soil and plants, and that’ll pay for itself soon enough. I also earned the joy of construction, making me doubly well off. Below I describe the method for building a raised garden bed that is two boards high, which provides good depth.
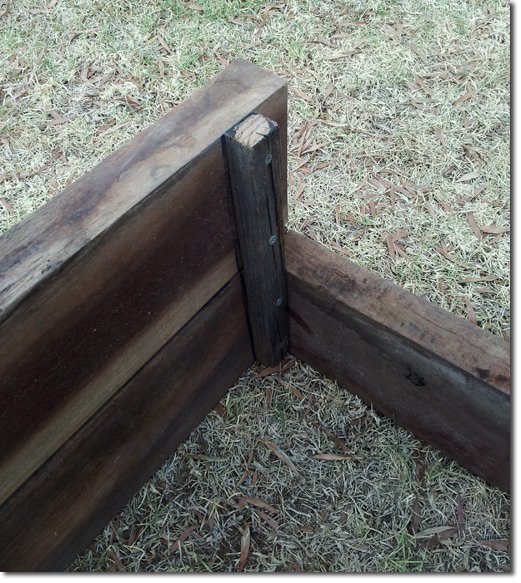
First thing you need to get is wood. You should aim for untreated hardwood or railway sleepers. Don’t buy wood brand new – it’s too expensive. In any case, it’s better to recycle, so find yourself a salvage yard. In Melbourne, secondhand hardwood boards can be sourced from between $3 or $4 a metre. Do the math and work out how much wood you need – not just the boards, but also a stake that can be used to attach the boards together (see below). Cut to size.

I then use the small stakes to join the side boards together.

In situ, attach the end boards to the sideboards, as seen below.
Then soak lots of newspaper and cardboard in water and then lay it in the bottom of the garden bed. This keeps weeds and grass at bay.

A raised bed this size will require a fair amount of soil, and I ordered some in (to supplement backyard too). Don’t skimp on soil. The cheapest stuff can be more sand than soil, which is no good for growing food. Soil is the foundation of a flourishing garden.

Start filling your bed with soil.

If you can get organised enough, grow your own seedlings rather than buying them. You’ll save lots of money.


Time to plant the bed up!

And in a month or so it will look like this. (Note mandarin tree at the end which I planted a year or so ago.):


Tell me that isn’t a beautiful nature strip! I dream of a day when every nature strip in suburbia looks like this (see “The Sufficiency Economy,” by Samuel Alexander).
Obviously, the same building method works just as well in the backyard/front yard.


For Australians, please see the competition being run by Reclaim the Curb, offering good prize money for the best curb-side garden!
~~~~
by Dr Samuel Alexander, co-director of the Simplicity Institute and a lecturer with the Office for Environmental Programs, University of Melbourne.


Get some soil?? Why not make some soil. Otherwise, you’re just robbing Peter to pay Paul. Sandwich-in some manure, clippings, cardboard, and compost that you can plant right in to and you’ll have soil soon enough.
This article is very helpful and made me more inspired. I used to think that it’s very complicated to attach the boards together; I now learned a simple way to do it. Thank you so much!
Awesome use of reclaimed materials!! Although we don’t tend towards raised beds here in the desert (we do sunken beds) – I’ve used a similar method as in other climates. You can find tons of old wooden pallets discarded in urban areas. I’ve used those to build raised beds and compost bins and they work wonderfully.
For raised beds, you do have to take them apart – usually a simple task – but mind the nails. I’ve always left the nails in, just hammered them so that they were flush against the wood. Then proceed as above.
For compost bins, use the pallets “as is” for 3-sided bins. Line with a fine wire or weave in some sticks if you find materials dribbling out the openings.
How do you get around council regulations and red tape? Our council will remove anything that they haven’t done themselves or approved and they will always throw up liability issues with structures on footpaths and road verges.
Thanks Sam. Am sharing this on Facebook so others may benefit from it too.
Cheers.
Great story and pics, I’ve shared this on garden to table permaculture facebook page. I’m sure this will help any new vegie gardener!
Cheers
Megan
Great story and pics for step by step guide
Nice one Samuel, but I know I couldn’t get away with a built up box on the nature strip where I am, I might try plants at ground level and see if that causes a fuss.
I know we need to push this kind of thing to set an example, so bravo for your efforts.
I am hoping to gorilla garden the odd roundabout in my town with “magical” overnight makeovers using semi-grown veggies and some rebel signage to make a point, a bit of subversive awareness raising.
I am curious too, have you tried much direct seeding, I find it much faster to get things established, and considering Melbourne’s climate you wouldn’t really need to start many things in a green house.
I find putting in lots of seed and thinning back ruthlessly makes for very strong lines, especially with seed saving and developing local and residential varieties. Seed is very cheap (or free) so scatter them liberally. Baby thinnings of all green leafy vegetables are great raw as are tiny beets and most babies from the allium family are tasty too.
And further handy info on dismantling pallets can be found here;
https://youtu.be/ZtPmUZ-k3aI
Do you have any issues with snails getting into beds.I’m looking for some options as I seem to have a major snail problem and was wondering if the wood detered them.
Donna barclay for snails get a small jar at the soil level and 3/4 fill with beer the snails and slugs will head straight on in and get trapped :)
Go to the hardware and buy some copper tape. Run it around pots and garden beds. Snails will not slither over it, they hate copper!
Hey Sam-awesome site!
Can you give details of any wood salvage yards you’ve used?
Many thanks
Hello I am in Victoria, near Frankston and surrounds. There are so many places that have wood free to collect in bins outside the factory’s they are off cuts and some really nice pieces. Masters have a section of free wood next to the off cuts also $1 & $2 pieces. Bunnings have very cheap off cuts too. Check gumtree also lots of free wood at times too.
Good luck and if in doubt weather it has been left for free collection knock on the Buisness door and ask. If you are friendly most people are amazing.
Old pellets are given away readily on gumtree and in my area too. :)
Hello Samuel
I’m replacing an old garden and putting four smaller versions of this in, made out of the old garden. Though I don’t know if you predrilled the boards and stakes, please tell.
Thank you.
Thanks, Sam,
Most interesting.
We are wanting to Build raised garden beds for our Mens Shed.
They will be substantially higher than yours, as we wish to:
> Make them accessible to wheel chairs
. Older/ sore back members can work comfortably and
> Yoiuger one can care for them without back strain.
Due to the cost of good soil we are considering rubble as a filler. However we are concerned re too much drainage.
We have access to cardboard and old carpet, but what happens when it rots? Any suggestions?
Thanks,
JJ
Hi John,
What I did with my daughters beds is – some I filled the base with prunings/sticks & bark from firewood then covered that with lawn clippings (think hugel); others I stacked in spoilt straw bales and others were filled with the bedding from the chook shed – we use deep litter method so a mix of straw, poop, feather, uneaten scraps an ash from fire all mixed together; each of these then topped with soil :) Hopefully by time they need a top up the compost will be ready. As it was/is a slow process her building them due to disability it works well by allowing us to reuse “seasonal” byproducts to lessen our costs with bonus of feeding the soil :) Hope this helps give you some ideas. Cheers
Hi John, I just read your comments above and we have some raised garden beds made from corrogated iron water tanks cut in half at Forster community garden http://www.fnc.org.au and as they are about 1metre high we filled the bottom with blue metal which is fine and aids drainage. Carpet is not good as it contains alot of toxins in the glue so definitely not good for growing food. I hope this helps!
Cheers
Megan
Nice ideas, but as someone who works the field, I would be wanting a real good homeowner’s insurance policy if someone trips over your boxes at night…
You have not used railway sleepers.
The sleepers you used are about 1 third the size of railway sleepers.
I love being green and recycling.
Your sleepers look brand new and have never been used on a railway, unless it was a big toy train set in your yard.
Its very sad when you include Permaculture Research Institute as if you are smart.
I have built 1 like yours many years ago and they are great.
1 am currently building a “real” railway sleeper bed 5 meters by 2.5 metres.
Extremely hard work. Extremely heavy. Extremely thick. railway sleepers are about 2.5 meters in length and about 30 cm by 15 cm thick.
I found a free supply from Vic Railway. They have since smashed up all the wood with an excavator so no more free.
This is the most heavy lifting I have ever done and I have worked as a furniture removalist for many years.
I’m pissed because I’m looking for good advice.
I will give some….
1.
I screw the sleepers together with galvanised bolts from Bunnings. They are about 15cm long and very thick. You will need a good drill with a “long”10mm drill bit or bigger and a socket wrench or shifter to turn it.
2.
Once you have leveled and screwed all the wood together.
You need to dig up the grass/soil inside your box (turn it over).
3.
Next you need to fill with newspaper or/and cardboard to create a bottom layer that will keep out weeds.
I looked at this post for help because some suggest that a plastic sheet may need to go underneath the cardboard or on top. Or even a layer of cloth from a material shop underneath the soil to keep out weeds.. I don’t think it matters under or over but it does sound good to have these spread under and outside your sleepers at least 30cm around your box. They say you should cover the 30 cm plastic around the box with mulch.
4.
Fill with soil. (if its on your front lawn the soil delivery driver should be able to dump it straight into your box. ?????? I don’t think this guy has ever really built a garden box. Sorry to be rude…. But why post it if you have no idea?????
5.
Lots of my neighbours have put poles in each corner and made a square frame around the box. They used steel poles. I’m going to use wood beems I got free..
6.
My neighbours put a cheap netting around the steel frame to keep out birds etc. It looks very professional and the white netting is cheap at Bunnings..
I was hoping to find some advice about this.
I am thinking of making a wooden frame around my garden box and putting shade cloth on the roof of my frame only and maybe cheap bird netting around the sides. I need advice because the land I’m using gets very hot in summer and has harsh hot wind also.
I want to block the wind and the sun glare from the roof, North, West and East.
I may cover the south side but if i cover the box then I will need access to it also.
I will also make rows of fresh soil mounds in the box with a trench in between each. I will cover the mounds with plastic sheet from bunnings> I will cut holes in the plastic sheeting on top of the raised mounds.
I will plant my tomato’s and other vegetables in the holes to keep in water and stop weeds.
I will also use mulch.
I hope this helps in the real world. Do it right and recycle or buy a kit from your local hardware or Aldi.
Note: You can get redgum from the hardware like the pictures in this web page and they are manageable for most men and work well.
Please don’t use “railway sleepers” unless you are able to move extremely heavy objects.
Note: You may also need a good circular saw if you need to cut the redgum to size. Railway sleepers are hard to cut.
the last garden box I made, I had Bunnings cut the sleepers to size. It was about $3.00 a cut but very much worth it. I have recently killed 2 Makita saws but the wood was free and I got heaps for fire wood which means I made many cuts.
Ask you hardware store to cut the redgum if you can because it makes everything square and your project will be much easier.
Please let me no if you have any economical methods for covering the box for shade. I want it to hold water because Melbourne, Australia summer weather is very harsh.
I am also going to try and use only water diverted from the house roof and I also have hoses to divert good grey water from my washing machine but I may just use the gray water around the outside of my garden box so the hot clayish soil with mulch on top does not suck my garden box soil dry and kill my plants.
Be careful with railway sleepers… Train brakes are made from asbestos and the sleepers are always full of it. Never use them for firewood and I would give them some serious thought before using them in a vegie garden
Andrew your rant was really disappointing to to read, especially given the fact that Samuel was imparting some really simple and helpful information, for those of us wanting to get started with our own DIY vege patches.
Samuel didn’t claim to have used
sleepers, they were merely referenced as a material to use.
Sharing ideas and information should be done to encourage people of all backgrounds and skill levels, to undertake projects like this, especially with their kids, passing these skills and information onto the next generation.
The methods outlined in Sam’s post are simple and concise. Thank you Samuel for your post.
Andrews rant was completely unnecessary and rather rude. Anyone who knows an thing about growing veggies would never advise using used railway sleepers!
What about termites- none of the timber looks like it has been treated. Treated timber anyway will leach arsenic and other substances into the soil and also be absorbed by the plants. I have used broken roof tiles in the past. I was able to get these from a roof tiler – most of them had chips in a corner due to damage in transit and not suitable for roof use. He gave them away – I just dug a trench and stood them upright , interlocking as I went- no termites, no chemicals. Just a thought.
I am in the Gold Coast Hinterland QLD sub tropical. Can I use recycled bessa concrete blocks? Will this evaporate or heat up the ground too much? Can I minimise this in any way?
i have been building no dig gardens for decades, I NEVER dig up the soil before covering it with newspaper. Make the paper or cardboard quite thick and overlapping. As this is a vege bed, the paper will rot down over time and make the most beautiful black soil. I have used all sorts of stuff as much, sand leaves, sawdust, old hay, and it all turns into beautiful soil, full of worms.
We are planning to build similar beds in a community garden. But the bed is surrounded by old “lawn” – a rough but vigorously growing mix of couch, kikuyu and weeds.
I have seen such a box lined inside with black plastic sheet, but the kikuyu sneaks up vertically between the wood and the plastic.
Question – How to stop the ingress of the runners of these grasses from going from outside the box, underneath the edge and sneaking up the inside to ruin everything?